 요즘 개발
요즘 개발
넥스터즈가 벌써 8주차로 곧 끝이 보이고 있다. 시간 진짜 빠르다...
내가 맡은 개발 분량은 끝났다. 개발중인 API가 완료되면 API 호출하는 거랑 정적 페이지 하나랑 리팩터링 정도 남은거 같다
그래서 배포를 신경쓰고 있는데 현재는 간단하게 vercel로 띄운 상태이다.
(꼼수지만 vercel은 organization에 속한 저장소는 돈을 내야하기 때문에 개인 저장소로 포크 떠서 배포했다 🙄)
하지만... 뭔가 있는 툴을 사용하는 건 내 성에 안차기도 하고, 이것저것 건드리면서 공부해보고 싶었다.

(참고) vercel에서도 콘텐츠 캐싱과 폰트나 이미지 캐싱또한 제공하고 있었다 ㅋㅎ;
그래서 직접 nginx와 docker, 그리고 최종 목표는 kubernetes까지 적용된 구조로 배포 환경을 구축해보기로 하였다.
또 사심이 들어갔지만 회사에서도 새로 구축할 인프라 아키텍쳐에도 익숙해지기 위해 직접 설정해보면서 공부하기로 했다 ㅎㅎ
(능력자 개발자님들이 설정해주신 거 따라가기 바쁜 주니어)
구축 순서
오늘 해본 사항은 전부 로컬에서 설정한 사항들로, 아직 production 빌드 설정까지 하지 않았다.
그리고 k8s 설정 전, 우선 docker로 기본 설정을 하고, 내일~주말동안 production 빌드 및 k8s 설정을 할 예정이다.
Docker, Nginx 설치 및 설정
로컬에서 연습할 Docker는 빠른 확인을 위해 mac용 도커를 설치했다.
보시다시피 image, container 확인 및 제거도 가시적이고 컨테이너 로그도 쉽게 확인 가능하며, docker exec -it 명령어로 직접 컨테이너에 접속했던 기능도 제공한다.
Nginx 설정
nginx는 nginx.conf 바로 설정하면 눈에 안보여서 로컬에 우선 Nginx를 설치하고 이를 건드리면서 먼저 설정했다.
mac에서 쉽게 brew install nginx 로 설치한 다음, /usr/local/etc/nginx/nginx.conf 를 수정하면서 직접 설정을 보면서 작업했다.
지금은 겨우 이미지, 폰트 캐싱 그리고 contents compression 정도만 설정했다.
| #user nobody; | |
| worker_processes auto; | |
| #error_log logs/error.log; | |
| #error_log logs/error.log notice; | |
| #error_log logs/error.log info; | |
| #pid logs/nginx.pid; | |
| events { | |
| worker_connections 1024; | |
| } | |
| http { | |
| include mime.types; | |
| include variable.conf; | |
| default_type text/html; | |
| # log | |
| log_format main '$remote_addr - [$time_local] "$request" $status $body_bytes_sent "$http_referer" "$http_user_agent" $request_time'; | |
| access_log access.log main; | |
| # gzip setting | |
| gzip on; | |
| gzip_disable "msie6"; | |
| gzip_min_length 256; | |
| gzip_comp_level 6; | |
| gzip_types | |
| text/plain | |
| text/css | |
| text/js | |
| text/xml | |
| text/javascript | |
| application/javascript | |
| application/x-javascript | |
| application/json | |
| application/xml | |
| application/rss+xml | |
| image/svg+xml; | |
| sendfile on; | |
| #tcp_nopush on; | |
| #keepalive_timeout 0; | |
| keepalive_timeout 65; | |
| #gzip on; | |
| server { | |
| listen 80; | |
| server_name localhost; | |
| location / { | |
| proxy_set_header HOST $host; | |
| proxy_pass http://node; | |
| proxy_http_version 1.1; | |
| proxy_redirect off; | |
| } | |
| location ~* \.(ico|css|js|gif|jpeg|jpg|png|woff|ttf|otf|svg|woff2|eot)$ { | |
| proxy_pass http://node; | |
| access_log off; | |
| expires max; | |
| add_header X-Asset "yes"; | |
| add_header access-control-allow-origin "*"; | |
| } | |
| } | |
| # HTTPS server | |
| # | |
| #server { | |
| # listen 443 ssl; | |
| # server_name localhost; | |
| # ssl_certificate cert.pem; | |
| # ssl_certificate_key cert.key; | |
| # ssl_session_cache shared:SSL:1m; | |
| # ssl_session_timeout 5m; | |
| # ssl_ciphers HIGH:!aNULL:!MD5; | |
| # ssl_prefer_server_ciphers on; | |
| # location / { | |
| # root html; | |
| # index index.html index.htm; | |
| # } | |
| #} | |
| include servers/*; | |
| } |
| upstream node { | |
| server localhost:3000; | |
| } |
localhost/ 에 접속해보니 잘 뜨는 것을 확인하고, 이제 docker에 빌드할 nginx 이미지의 conf 파일을 설정했다.
Docker 설정
우선 k8s 도입전 설정은 이렇다.
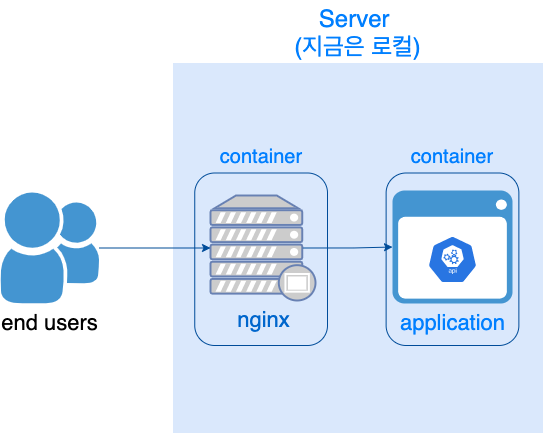
따라서 docker-compose로 nginx와 내 application 이미지를 동시에 빌드하고 실행하려 한다.
또 docker-compose로 설정하면 좋은 점은 docker-compose.yml 파일 내 이미지들은 같은 네트워크를 공유한다는 것이다.
또한, docker-compose.yml 에서 설정한 컨테이너명이 곧 IP 주소이다.
(참고)
따라서 nginx에서 다른 컨테이너로 떠있는 application으로의 통신이 가능하다.
그러기 위해서는 앞서 설정했던 conf에서 variable.conf를 컨테이너명으로 수정해야 한다.
| upstream node { | |
| server {컨테이너명}:3000; | |
| } |
PM2 설정
그리고 모니터링을 위해 pm2를 설정하였다. 이건 회사에서 미리 설정해주신 부분을 보면서 따라했다.
| const PROFILES = { | |
| local: { | |
| instances: 1, // number of app instance to be launched | |
| node_args: '--trace-warnings', // alias to interpreter_args | |
| }, | |
| production: { | |
| instances: 1, // 미정 | |
| }, | |
| } | |
| function createPm2Config() { | |
| const profile = process.env.NEXT_PUBLIC_ENV | |
| const envConfig = PROFILES[profile] | |
| return { | |
| apps: [ | |
| { | |
| name: 'node-web-server', // pm2 에서 관리하는 이름 | |
| script: 'node_modules/next/dist/bin/next', // 앱을 구동할 경로 | |
| args: 'start', // string containing all arguments passed via CLI to script | |
| cwd: './', // the directory from which your app will be launched | |
| interpreter: 'node', // interpreter absolute path | |
| exec_mode: 'cluster', // mode to start your app, can be “cluster” or “fork”, default fork | |
| max_restarts: 5, // number of consecutive unstable restarts | |
| min_uptime: 5000, // min uptime of the app to be considered started | |
| log_date_format: '<YYYY-MM-DD HH:mm:ss>', // log date format | |
| env: { // env variables which will appear in your app | |
| NODE_ENV: 'production', | |
| NEXT_PUBLIC_ENV: profile || 'local', | |
| }, | |
| ...envConfig, | |
| }, | |
| ], | |
| } | |
| } | |
| console.log(JSON.stringify(createPm2Config(), null, '\t')) | |
| module.exports = createPm2Config() |
⚠️ 이상한 점 : REACT_APP_ENV 환경변수가 제대로 설정되지 않는 이슈가 있다. 이건 내일 더 찾아보기
(해결)
Dockerfile에서 'ENV' 옵션으로 REACT_APP_ENV 를 추가하니 해결되었다.
ARG는 빌드타임에 사용가능한 변수이고, ENV는 환경변수인데 ENTRYPOINT로 pm2-runtime 시에는 환경변수로 줘야 하나보다...
그리고 docker-compose 설정은 다음과 같다.
nginx 이미지의 port는 nginx.conf에서 설정했던 listen 80 과 일치해야 한다.
| version: '3' | |
| services: | |
| nginx: | |
| image: nginx | |
| ports: | |
| - '80:80' | |
| volumes: | |
| - ./deployment/configs/nginx.conf:/etc/nginx/nginx.conf | |
| - ./deployment/configs/variable.conf:/etc/nginx/variable.conf | |
| app: | |
| build: | |
| context: . | |
| args: | |
| NEXT_PUBLIC_ENV: local |
| FROM node:alpine | |
| EXPOSE 3000 | |
| ARG NEXT_PUBLIC_ENV | |
| ENV NEXT_PUBLIC_ENV=${NEXT_PUBLIC_ENV} | |
| WORKDIR /app/admin | |
| COPY ./package*.json ./ | |
| RUN npm install pm2 -g | |
| RUN npm ci | |
| COPY ./ ./ | |
| RUN echo "Based on env: $NEXT_PUBLIC_ENV" | |
| RUN npm run build:${NEXT_PUBLIC_ENV} | |
| ENTRYPOINT pm2 list && NEXT_PUBLIC_ENV=${NEXT_PUBLIC_ENV} pm2-runtime start pm2.config.js |
docker-compose.yml 에서 app 서비스는 Dockerfile을 사용하고, args로
REACT_APP_ENV를 주었다. (우선 로컬로)
이제 docker-compose 명령어로 빌드 및 실행을 한번에 한다.
docker-compose up -d # -d 옵션은 백그라운드 실행
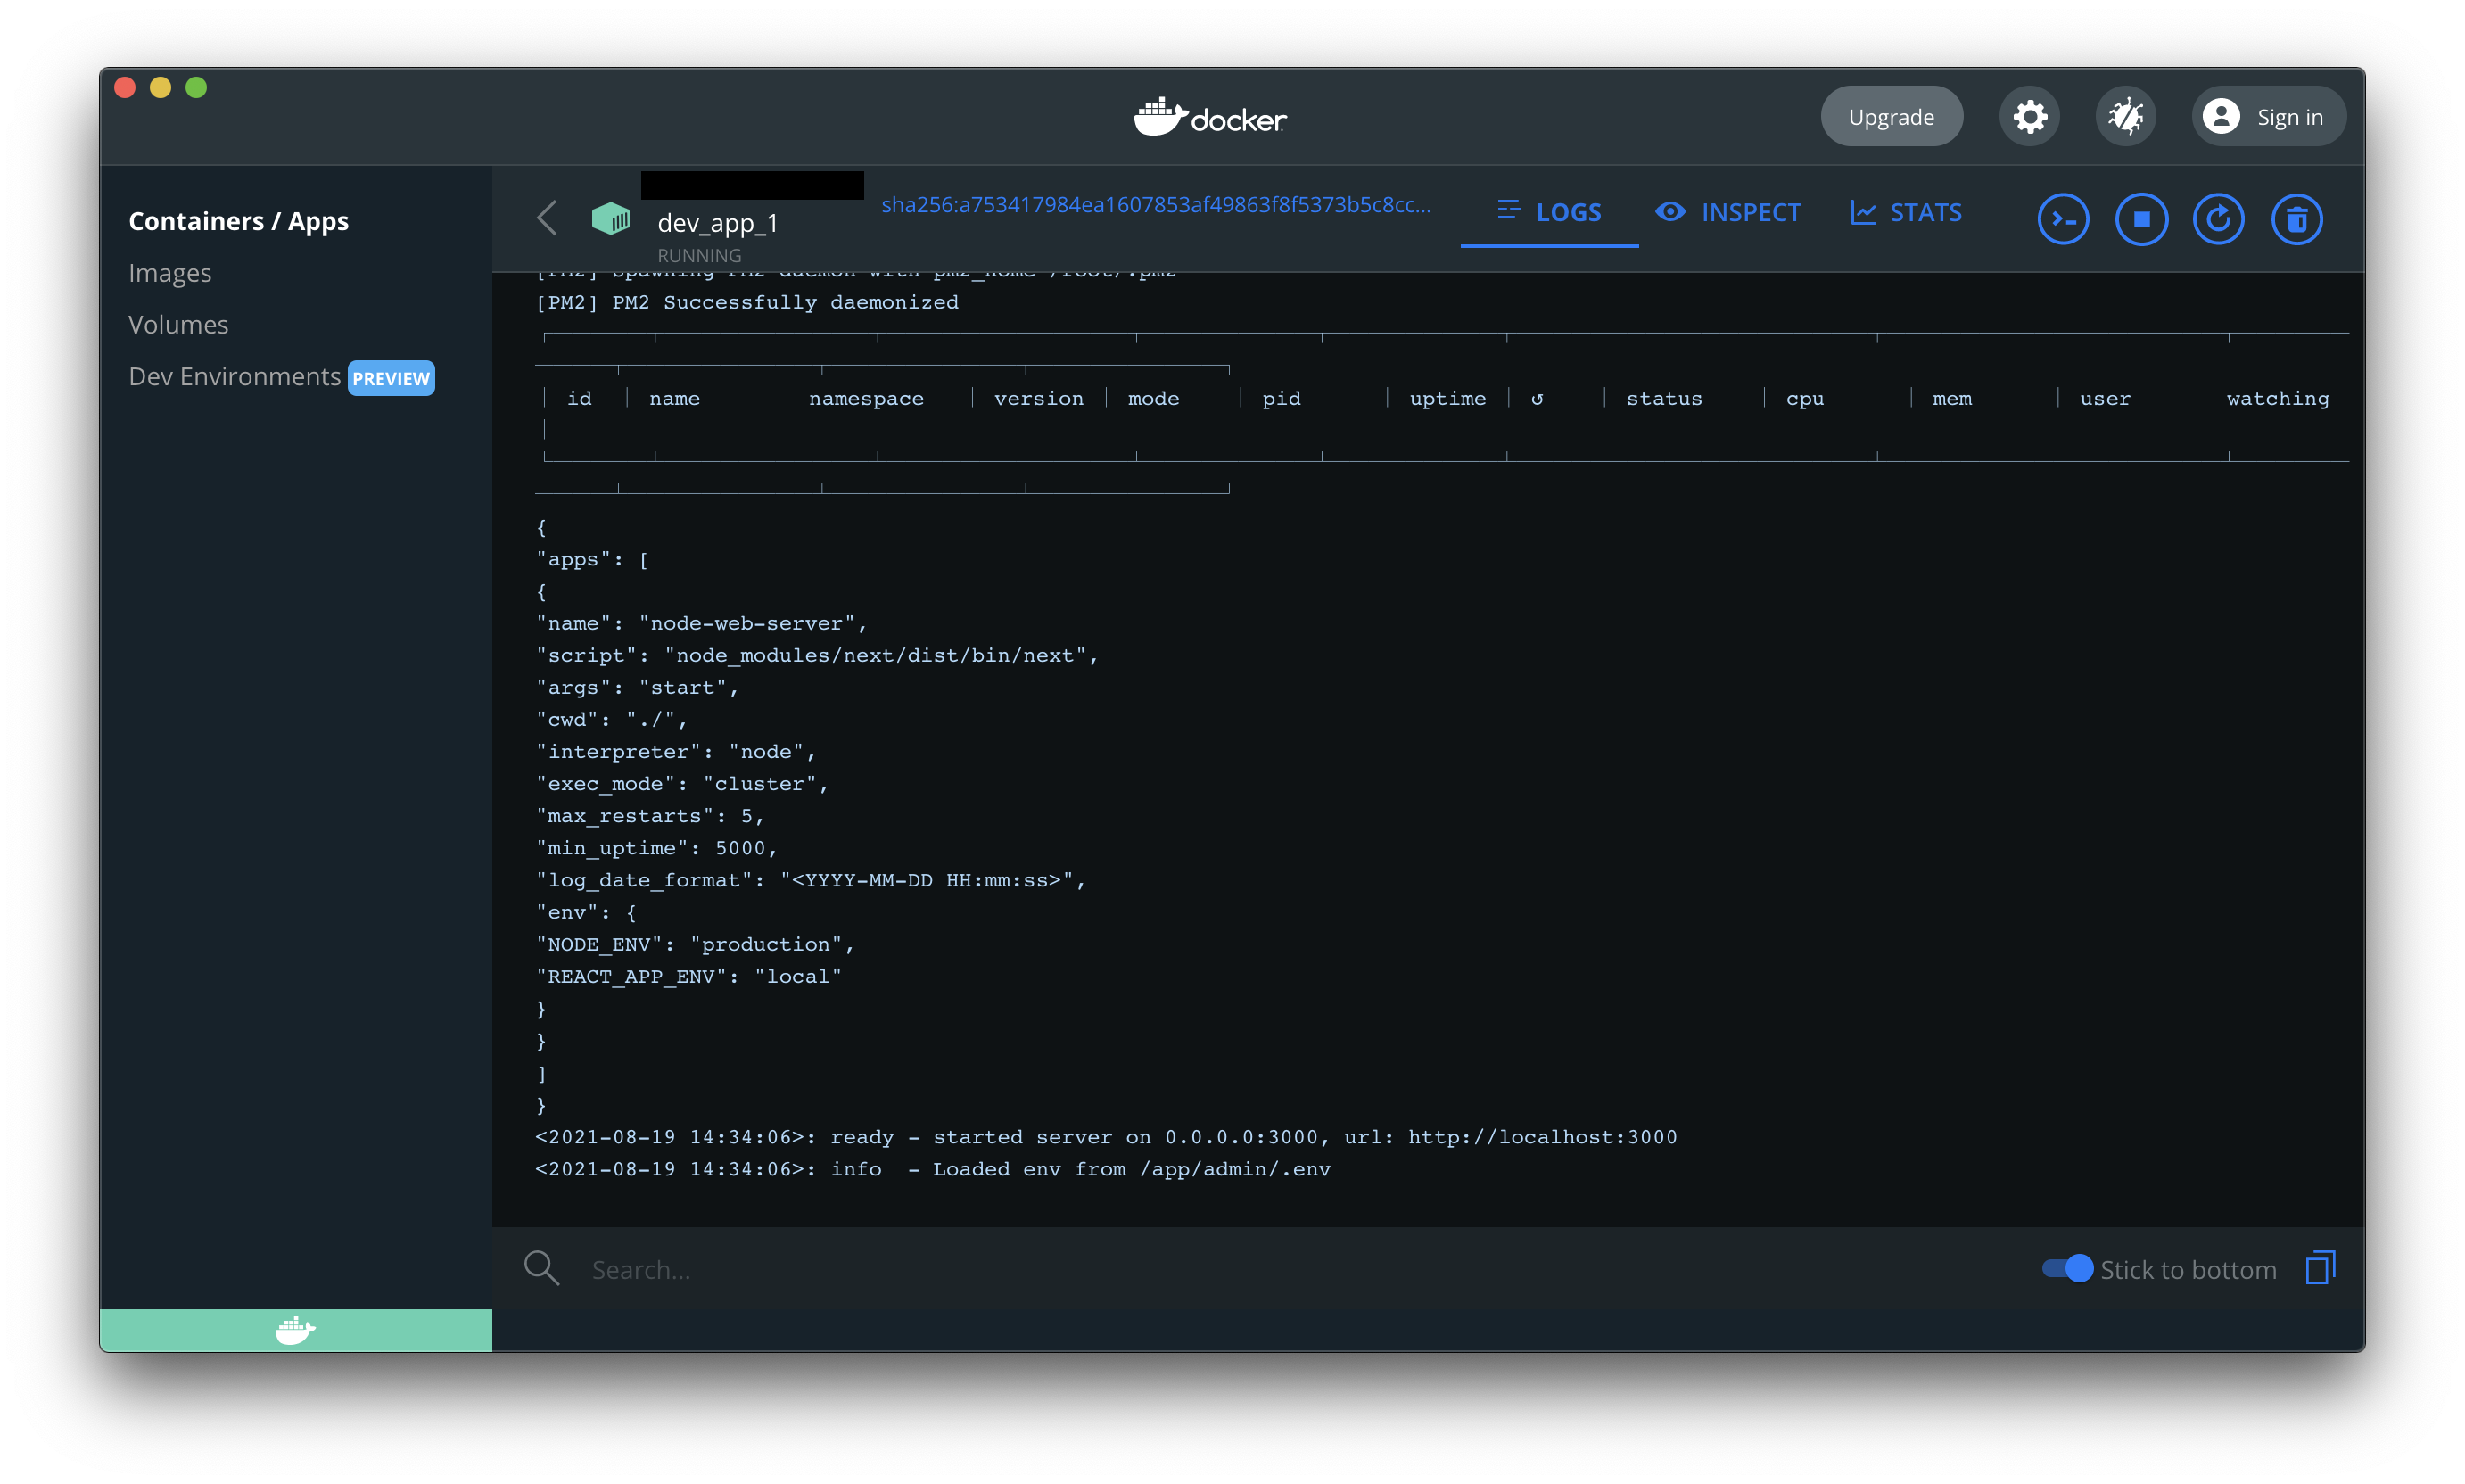
정상적으로 실행되었다면 docker 클라이언트에서 컨테이너나 docker container ls 명령어로 컨테이너들을 확인할 수 있다.

각 컨테이너를 클릭해서 로그로 정상적으로 구동되었는지 확인한다.
Nginx 설정 수정
쓰다보니 브라우저 캐시 설정만으로 정적 컨텐츠를 캐싱하는건 성능이 좋지 못한거 같았다.
그래서 프록시 캐시 사용을 위해 proxy_cache 설정으로 교체했다.
캐싱할 대상은 폰트, 이미지 등 정적 컨텐츠와 /_next/static 에 포함된 정적 페이지들이다.
| http { | |
| # 중략 | |
| proxy_cache_path /usr/share/nginx/cache levels=1:2 keys_zone=my_cache:10m max_size=1g; | |
| server { | |
| listen 80; | |
| server_name _; | |
| location / { | |
| proxy_set_header HOST $host; | |
| proxy_pass http://node; | |
| proxy_http_version 1.1; | |
| proxy_redirect off; | |
| } | |
| location ~* \.(ico|css|gif|jpeg|jpg|png|woff|ttf|otf|svg|woff2|eot)$ { | |
| proxy_cache my_cache; | |
| proxy_ignore_headers Cache-Control; | |
| proxy_cache_valid 30d; | |
| proxy_pass http://node; | |
| add_header X-Asset "yes"; | |
| add_header access-control-allow-origin "*"; | |
| } | |
| location /_next/static { | |
| proxy_cache my_cache; | |
| proxy_pass http://node; | |
| } | |
| } | |
| } |
설정 후 nginx 이미지를 다시 빌드하고 컨테이너에 접속해보면 /usr/share/nginx/cache 에 캐싱되고 있음을 확인할 수 있다.
환경변수 수정
지금까지 잘못 생각한 게 있었다 ㅠㅠ
Nextjs에서는 `NEXT_PUBLIC_`을 붙이면 브라우저까지 환경변수를 expose해준다.
단, 빌드 타임에 브라우저로 보내는 JS에 인라인하므로 빌드 타임 시 설정해주어야 한다.
(출처)
정리
아직은 로컬에서만 화면을 띄워봤지만 곧 사용할 클라우드 플랫폼이 정해지면 docker-compose.yml에서 args만 production으로 수정하고 빌드하면 되지 않을까 하는 행복회로를 돌리고 있다. 🙄 아직 ssl인증서를 구입하지 않았는데 구입 후에는 nginx에 https를 붙이는 작업이 남았다.
지금 설정된 구성에서 k8s를 붙이는 작업을 남은 시간동안 해봐야겠다. (k8s 붙이면서 변경될 수 있을 듯...)
사실 우리는 인스턴스 하나만 사용하기 때문에 다중 컨테이너를 관리하는 k8s가 적합하지 않을수도 있지만 재밌으니까 ㅎㅎ 더 해보려고 한다!
참고 자료
'Projects > 넥스터즈 19기' 카테고리의 다른 글
| 8/26 Nexters 9주차 : HTTPS 적용 (0) | 2021.08.26 |
|---|---|
| [NCP] Helm 사용하여 Kubernetes 기반으로 서비스 배포하기 (0) | 2021.08.24 |
| 7/31 넥스터즈 5주차 : 단위테스트, 디자인 시스템 (0) | 2021.08.01 |
| 7/16 넥스터즈 3주차 (2) : 에러 처리 설계와 SWR (4) | 2021.07.16 |
| 7/16 넥스터즈 3주차 (1) : 인증 구현 (0) | 2021.07.16 |


