 요즘 개발
요즘 개발
3/31일에 Toast 알람을 custom hook으로 한 파일 내에서 구현을 하였다.
그러다 보니 해당 컴포넌트를 함수 실행으로 가져온다거나, 컴포넌트 업데이트를 위한 별도의 state를 두는 등의 좋지 않은 패턴을 썼었다.
저번 포스팅에서의 개선점들을 다시 열거하자면,
1. ToastContainer를 함수로 쓰는게 거슬린다!
<ToastContainer />로 쓰고 싶다 ㅠㅠ
2. setInterval()이 성능에 영향을 줄 거 같다.
따라서 시각적인 변화는 requestAnimationFrame의 콜백함수에서 해결하고 싶은데 가능할까?
3. trigger state말고 ToastBox 업데이트를 할 수 있는 방법을 찾아보자.
등의 고려 사항이 있었다.
따라서 오픈 소스 라이브러리인 react-toastify 소스 코드를 분석해보고 해당 구조를 차용해보았다.
[관련 소스]
https://github.com/fkhadra/react-toastify
1. 요구 사항 재정의
기존의 요구사항을 조금 변경하고, 성능적인 측면을 고려한 설계를 해보고 싶었다.
막상 하나의 파일로 만드니 컴포넌트 수정이나 추후 기능 확대 등이 불가능할듯 하여 파일을 분리하기로 했다.
1. 뷰, 컨트롤러 파일 분리
2. 타입과 액션 분리하여 기능 표현
3. 별도의 state없이 ToastContainer 업데이트
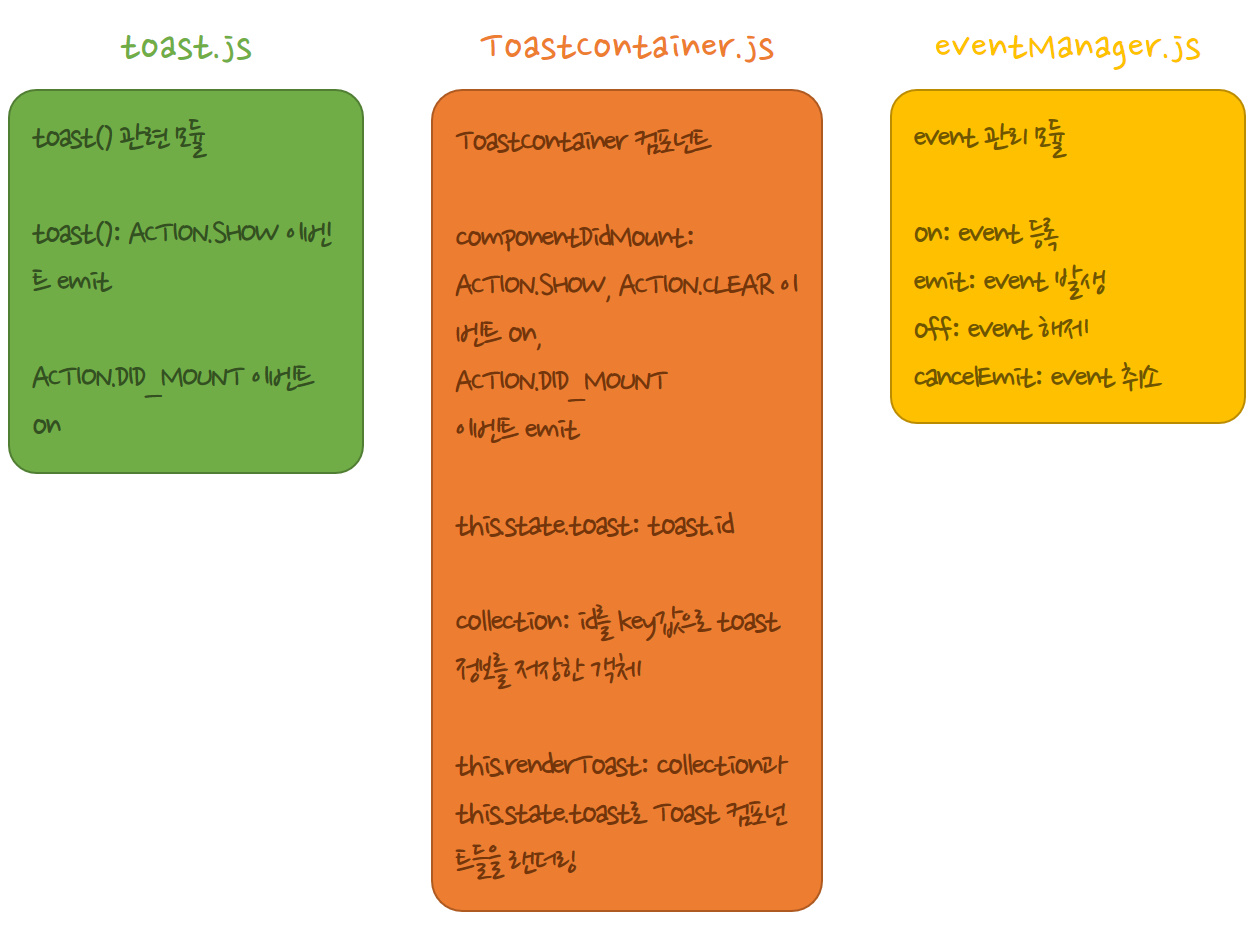
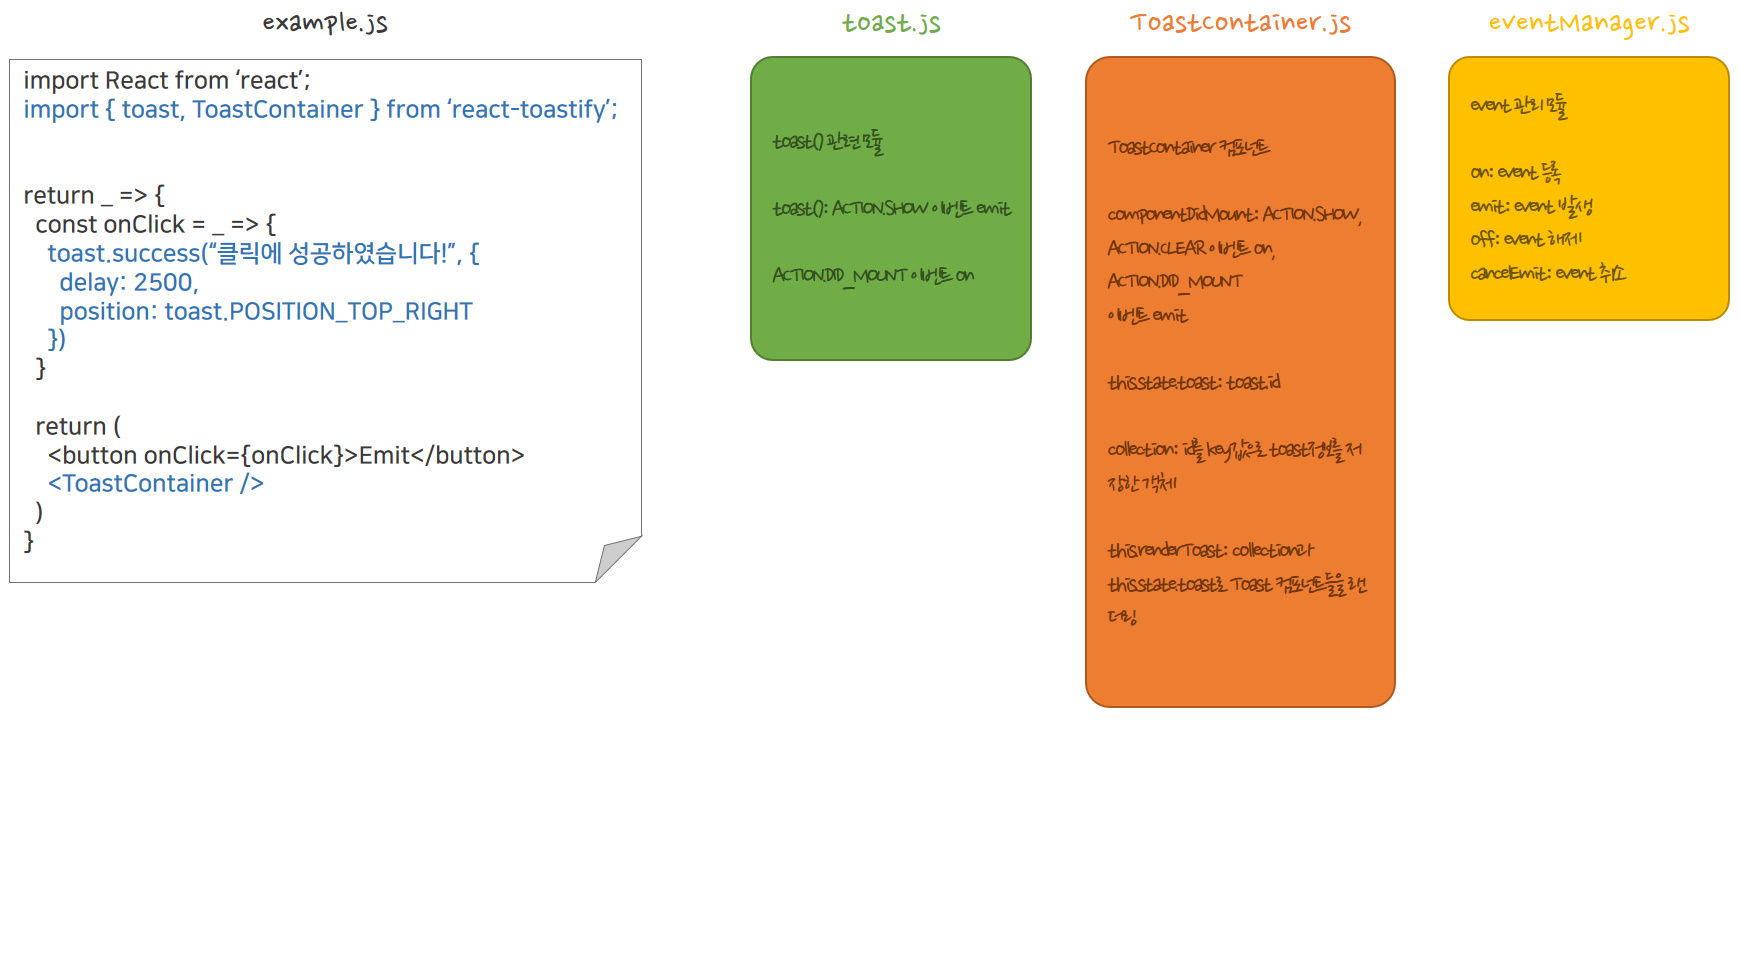
2. react-toastify 코드 분석
타입을 정의한 파일이나 기타 컴포넌트들은 제외하고 중요하게 볼 파일은 다음 세 파일이었다.
-
toast.js: toast 메세지를 생성하는 함수 모듈
-
utils/eventManager.js: ACTION 타입마다 콜백함수를 미리 등록하고(on), 원하는 시점에 이벤트를 실행시켜 인자를 받아 콜백함수를 실행하는 모듈(emit)
-
components/ToastContainer.js: Mount 시, eventManager에 toast를 빌드하는 함수와 제거하는 함수를 등록하여 toast 메세지 랜더링
따라서 해당 라이브러리에서 toast를 불러와 사용할 때에는 ToastContainer를 별도로 랜더링해주고, toast함수를 실행하면 된다.
또한 POSITION 타입에 따라 화면의 네 방향에서 toast 메세지를 띄울 수 있도록 구현되었다.
추가로, toast.js에서는 굳이 ToastContainer를 미리 랜더링하지 않아도 toast를 띄울 때 랜더링하여 사용할 수 있도록 구현되었다.
또한 toastId로 toast 객체들을 구분지어 이를 업데이트하거나 dismiss하는 모듈또한 제공하고 있다.
3. 차용한 부분
내가 원하는 기능은 이전과 마찬가지로 우측 상단에 toast 메세지를 띄우고, 삭제하는 기능뿐이라 react-toastify 중 원하는 기능을 차용해서 구현하면 될거 같았다.
따라서 react-toastify에서 제공하는 다음의 기능은 제외하고 나머지 부분들을 구조를 따라해보았다.
- ToastContainer lazy mount
- toast.update 관련 모듈
- toast.POSITION
- multiple ToastContainers
우선 eventManager.js는 그대로 사용하였다.
|
1
2
3
4
5
6
7
8
9
10
11
12
13
14
15
16
17
18
19
20
21
22
23
24
25
26
27
28
29
30
31
32
33
34
|
module.exports = {
list: new Map(),
emitQueue: new Map(),
on: function(event, callback) {
this.list.has(event) || this.list.set(event, []);
this.list.get(event).push(callback);
return this;
},
off: function(event) {
this.list.delete(event);
return this;
},
emit: function(event, ...args) {
this.list.has(event) &&
this.list.get(event).forEach(callback => {
const timer = setTimeout(_ => {
callback(...args);
}, 0);
this.emitQueue.has(event) || this.emitQueue.set(event, []);
this.emitQueue.get(event).push(timer);
});
},
cancelEmit: function(event) {
const timers = this.emitQueue.get(event);
if (timers) {
timers.forEach(timer => clearTimeout(timer));
this.emitQueue.delete(event);
}
return this;
}
};
|
react-toastify의 ToastContainer.js는 클래스 컴포넌트로 구성되어 있는데, 이것을 함수형 컴포넌트로 변경하였다. 소스코드에서는 클래스 컴포넌트 내 this를 인자로 하여 ACTION.DID_MOUNT를 emit하여 container를 리스트로 여러개 가지고 있어 다양한 핸들링이 가능하게끔 구현했는데 나는 딱 하나만 필요하기 때문에 클래스 컴포넌트로 할 필요가 없었다.
만약 ToastContainer를 여러개 사용하고 싶은 경우에는 원래처럼 클래스 컴포넌트로 하여 해당 인스턴스를 리스트로 관리하는 편이 깔끔할 것이다.
components/Toast/ToastContainer.js
|
1
2
3
4
5
6
7
8
9
10
11
12
13
14
15
16
17
18
19
20
21
22
23
24
25
26
27
28
29
30
31
32
33
34
35
36
37
38
39
40
41
42
43
44
45
46
47
48
49
50
51
52
53
54
55
56
57
58
59
60
61
62
63
64
65
66
67
68
69
70
71
72
73
74
75
76
77
78
79
80
81
82
83
84
85
86
87
88
89
90
91
92
93
|
import './Toast.style.css';
import React, { useEffect, useState, useRef } from 'react';
import eventManager from '../../utils/eventManager';
import Toast from './Toast';
import { ACTION } from '../../constants/event-types';
let collection = {};
const ToastContainer = React.memo(_ => {
const [toasts, setToasts] = useState([]);
const containerRef = useRef();
// 컴포넌트가 처음 마운트되었을 때 ACTION.SHOW, ACTION.CLEAR 이벤트 등록
useEffect(_ => {
eventManager
.on(ACTION.SHOW, (content, options, delay) =>
containerRef ? buildToast(content, options, delay) : null
)
.on(ACTION.CLEAR, _id =>
!containerRef ? null : _id == null ? clear() : removeToast(_id)
)
return _ => eventManager.off(ACTION.SHOW).off(ACTION.CLEAR);
}, []);
// toast 메세지를 collection객체와 toasts에 저장 및 setTimeout 실행
const buildToast = (content, options, delay) => {
const closeToast = _ => removeToast(options._id);
const toastOptions = {
...options,
closeToast: closeToast
}
appendToast(content, toastOptions);
setTimeout(_ => {
closeToast();
}, delay);
}
const appendToast = (content, options) => {
const { _id } = options
collection = {
...collection,
[_id]: {
options,
content
}
};
setToasts(prev => [...prev, _id]);
}
const clear = _ => setToasts([]);
const removeToast = _id => {
setToasts(prev => prev.filter(p => p !== _id))
}
const renderToast = _ => {
const toastToRender = [];
const keys = Object.keys(collection);
keys.forEach(k => {
const { options, content } = collection[k];
if (toasts.indexOf(options._id) !== -1) {
toastToRender.push(
<Toast
{...options}
key={`toast-${options._id}`}
>
{content}
</Toast>
);
} else {
toastToRender.push(null);
delete collection[k];
}
});
return <>{ toastToRender }</>
}
return (
<div ref={ containerRef } id="toast-container">
{ renderToast() }
</div>
)
});
export default ToastContainer;
|
toast.js는 content와 options, delay를 인자로 받아서 ACTION.SHOW 이벤트를 emit하도록 구현했다. 타입을 더 편하게 쓰고 싶어 toast.success, toast.warn, toast.info, toast.error 또한 구현하여 사용하였다.
utils/toast.js
|
1
2
3
4
5
6
7
8
9
10
11
12
13
14
15
16
17
18
19
20
21
22
23
24
25
26
27
28
29
30
31
32
33
34
35
36
37
38
39
40
41
42
43
44
45
46
47
48
|
import * as uuidv4 from 'uuid/v4';
import eventManager from './eventManager';
import { ACTION, TYPE } from '../constants/event-types';
const generateId = _ => uuidv4();
const usableToastId = _id =>
typeof _id === 'string' ||
typeof _id === 'number' && !isNaN(_id)
const getToastId = options =>
options &&
usableToastId(options._id)
? options._id
: generateId()
const mergeOptions = options => ({...options, _id: getToastId(options) })
const attachType = (options, type) => mergeOptions({ ...options, type: type })
const dispatchToast = (content, options, delay = 2000) => {
eventManager.emit(ACTION.SHOW, content, options, delay);
}
const toast = (content, options, delay) =>
dispatchToast(content,
mergeOptions(options),
delay)
toast.error = (content, delay) => dispatchToast(content,
attachType({}, TYPE.ERROR),
delay)
toast.info = (content, delay) => dispatchToast(content,
attachType({}, TYPE.INFO),
delay)
toast.warn = (content, delay) => dispatchToast(content,
attachType({}, TYPE.WARN),
delay)
toast.success = (content, delay) => dispatchToast(content,
attachType({}, TYPE.SUCCESS),
delay)
export default toast;
|
최종 결과 화면은 다음과 같이 동일하게 동작하면서 모듈화하였고, 별도의 trigger용 state없이도 잘 동작하였다.
지금 생각해보니 eventManager가 곧 상태관리 라이브러리 redux와 유사한 듯!
'Today I Learn > 프론트엔드' 카테고리의 다른 글
| [리액트] 컴포넌트와 Hook (0) | 2020.04.23 |
|---|---|
| [리액트] Hook 렌더링 최적화 실무 적용기 (7) | 2020.04.09 |
| TDZ (Temporal Dead Zone)이란? (0) | 2020.04.06 |
| [리액트]크로스 브라우징 이슈 해결 경험기 (0) | 2020.04.03 |
| [리액트] Toast 알람 구현 (1) (0) | 2020.03.31 |


